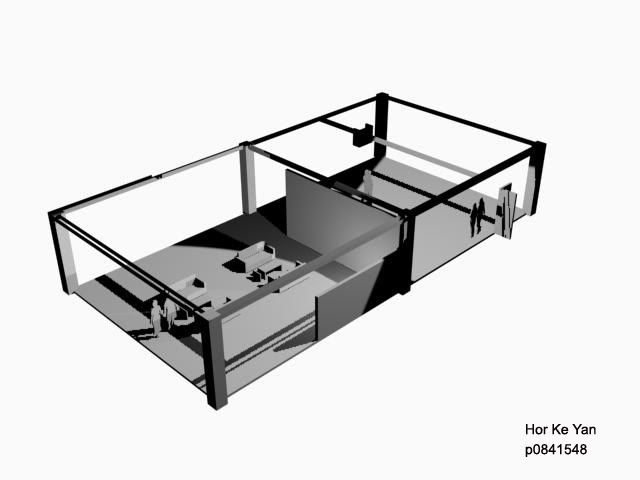
This my walkthrough for the shophouse.
The reason why it wasn't properly rendered in Viz because the day before submission, my viz file got corrupted so I didn't have time to do a proper one. Therefore this was done after submission whereby I just render per frame and then compile it into a video by the help of Window Movie Maker.
Saturday, February 14, 2009
Friday, February 13, 2009
13/2
Shophouse Models
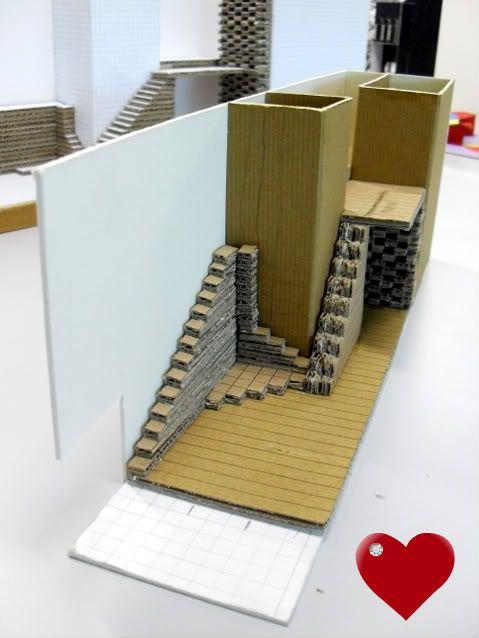
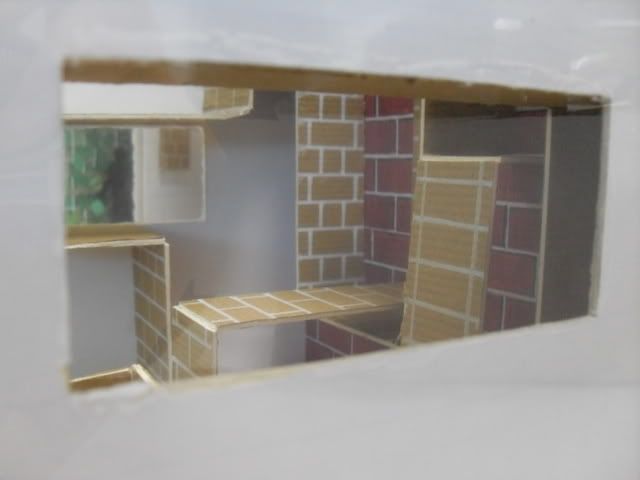
This is my 1st mockup of the shophouse. It's scale is 1:75 because 1:50 is too big and 1:100 is too small.
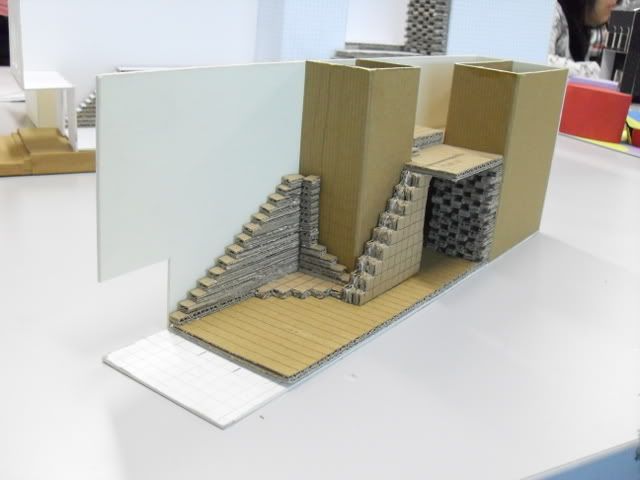
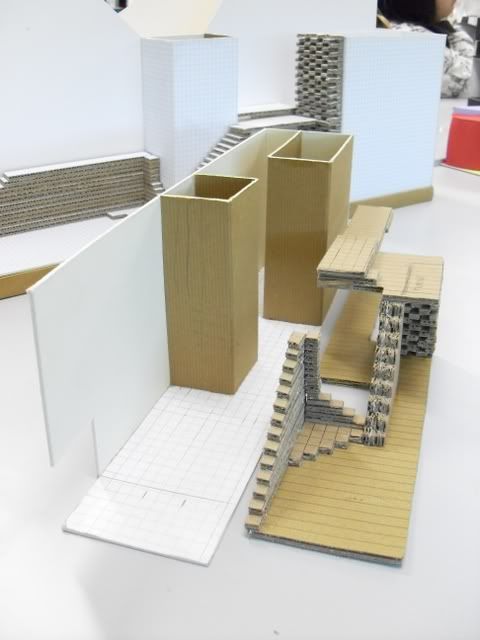
This is why I really love it! Isn't it cool, haha I can take out and look.

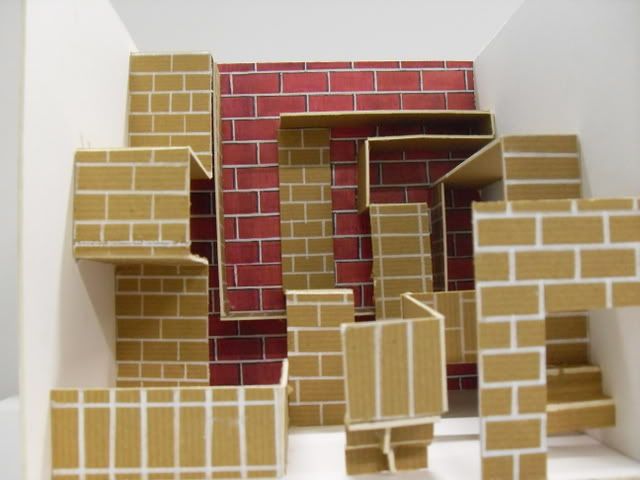
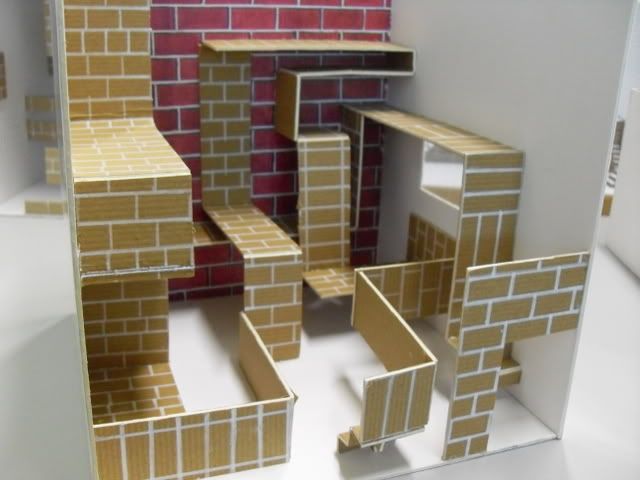
This is my 2nd shophouse model. For this I stick on pieces of section pad because I need the grids to guide me along. Every 2 5mm by 5mm grid is a brick. So that's how I go about laying down the bricks.
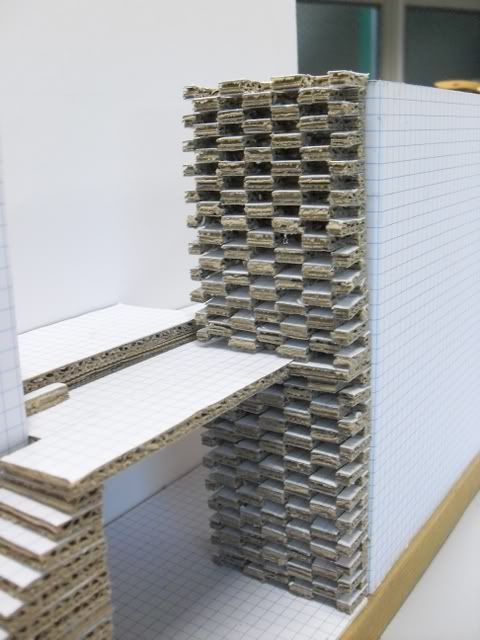
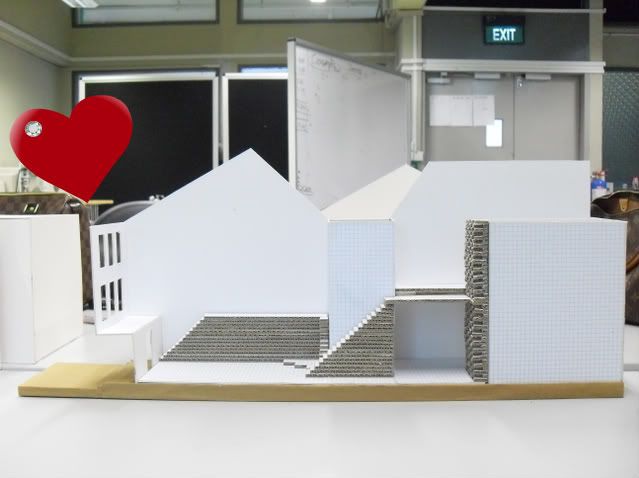
Isn't it lovely? I really love it but this is not the final model
I will posts up the photos of the final model soon because I still have some parts here and there to change.
(:

This is my 1st mockup of the shophouse. It's scale is 1:75 because 1:50 is too big and 1:100 is too small.


This is why I really love it! Isn't it cool, haha I can take out and look.

This is my 2nd shophouse model. For this I stick on pieces of section pad because I need the grids to guide me along. Every 2 5mm by 5mm grid is a brick. So that's how I go about laying down the bricks.


Isn't it lovely? I really love it but this is not the final model
I will posts up the photos of the final model soon because I still have some parts here and there to change.
(:
Thursday, February 12, 2009
12/2
Mood box
I admit that when I first read the project brief; I'm at loss. I'm not quite sure of how to go about creating a space in a 200m by 200mm by 200mm. And I guess this is quite apparent in my first moodbox.
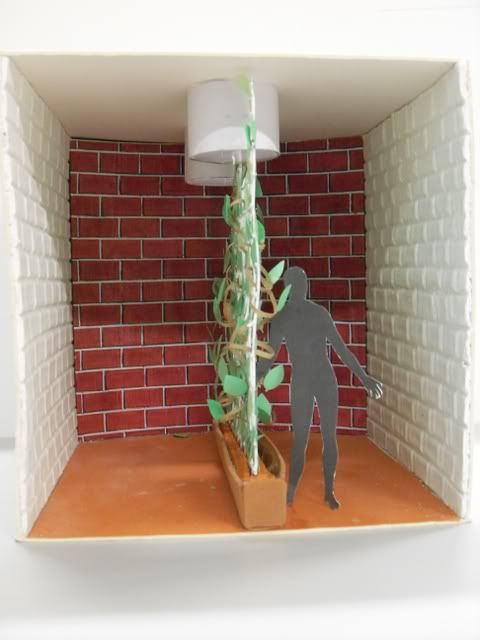
1st Moodbox
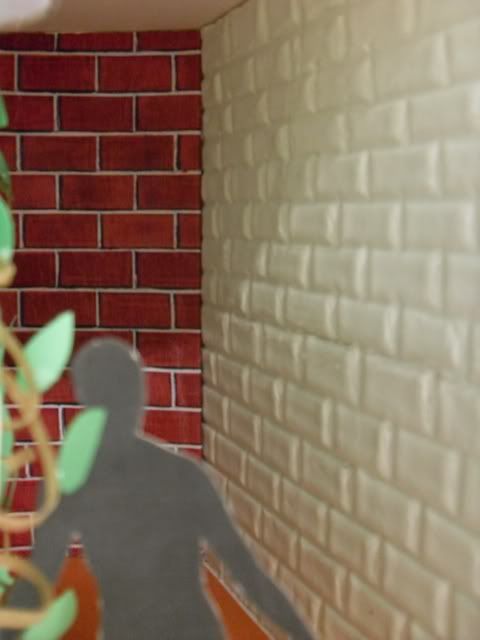
Over here I just incorporate signature objects/structural elements that can be found in his buildings. Which in this case is the skylights, plant wall, curved brick wall at the back and lastly white bricks at the side.
However after my first consultation with the tutors, I realized that I'm straying from the right track and that creating a space isn't by throwing objects/structural elements inside.
But basically for this moodbox I really love the two side of the wall which is made entirely out of a wine bottle, 3 packet of clay and 2 satay sticks (:
I'm glad that a lot of people like this part of the moodbox.
Moving on:
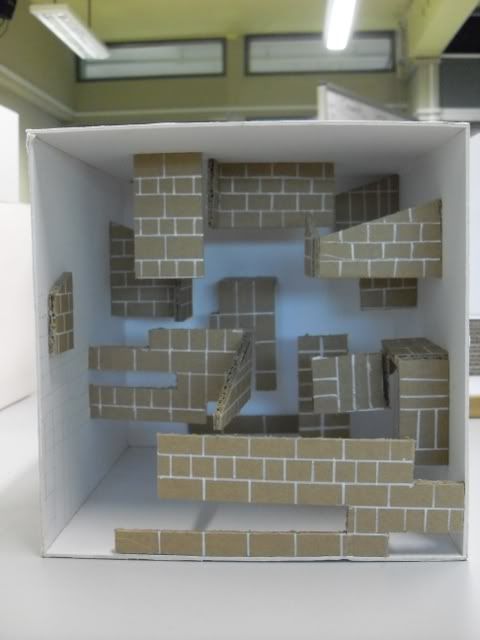
My 2nd Moodbox
This can be consider a breakthrough from the first moodbox and the whole concepts and ideas are totally different but one thing remains: BRICKS.
For this I drew lines on the cardboard to sort of bring out the idea to the people that these are brick walls. Unfortunaetly, there isn't a path inside this whole space so I was given 1 smiley face during the moodbox review. Then again, it was quite unexpected because I thought that I would get a not smiley face as I felt that my progress was too slow.
Lastly:
My 3rd and the final moodbox.
This time round the brick walls are laid to show a path that have a start and an end.
I admit that when I first read the project brief; I'm at loss. I'm not quite sure of how to go about creating a space in a 200m by 200mm by 200mm. And I guess this is quite apparent in my first moodbox.

1st Moodbox
Over here I just incorporate signature objects/structural elements that can be found in his buildings. Which in this case is the skylights, plant wall, curved brick wall at the back and lastly white bricks at the side.
However after my first consultation with the tutors, I realized that I'm straying from the right track and that creating a space isn't by throwing objects/structural elements inside.
But basically for this moodbox I really love the two side of the wall which is made entirely out of a wine bottle, 3 packet of clay and 2 satay sticks (:

I'm glad that a lot of people like this part of the moodbox.
Moving on:

My 2nd Moodbox
This can be consider a breakthrough from the first moodbox and the whole concepts and ideas are totally different but one thing remains: BRICKS.
For this I drew lines on the cardboard to sort of bring out the idea to the people that these are brick walls. Unfortunaetly, there isn't a path inside this whole space so I was given 1 smiley face during the moodbox review. Then again, it was quite unexpected because I thought that I would get a not smiley face as I felt that my progress was too slow.
Lastly:

My 3rd and the final moodbox.
This time round the brick walls are laid to show a path that have a start and an end.


Wednesday, February 11, 2009
11/2
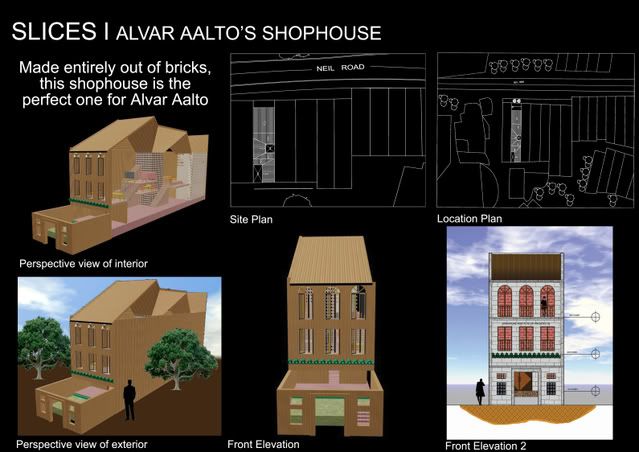
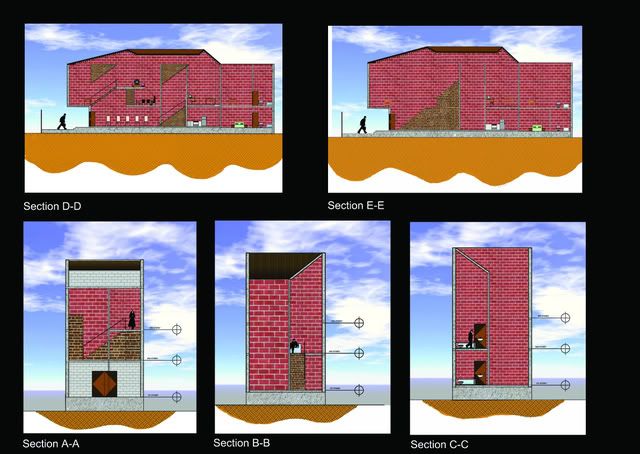
Final Presentation Boards
I put quite a lot of efforts in rendering the plans/elevations and sections through photoshop as I know that my rendering from VIZ isn't really great.
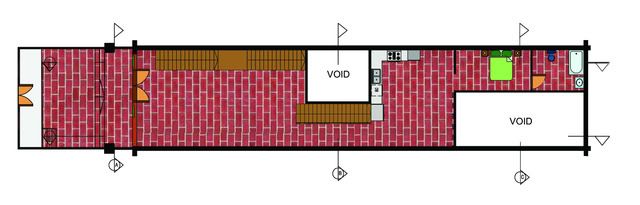
First storey plan
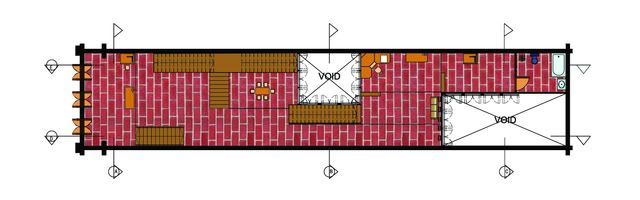
Second storey plan
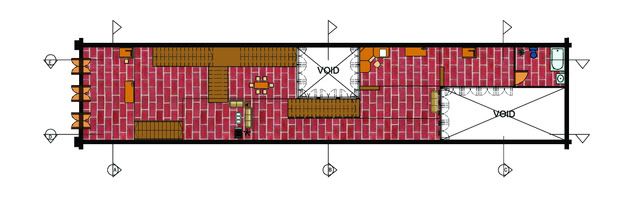
Third storey plan
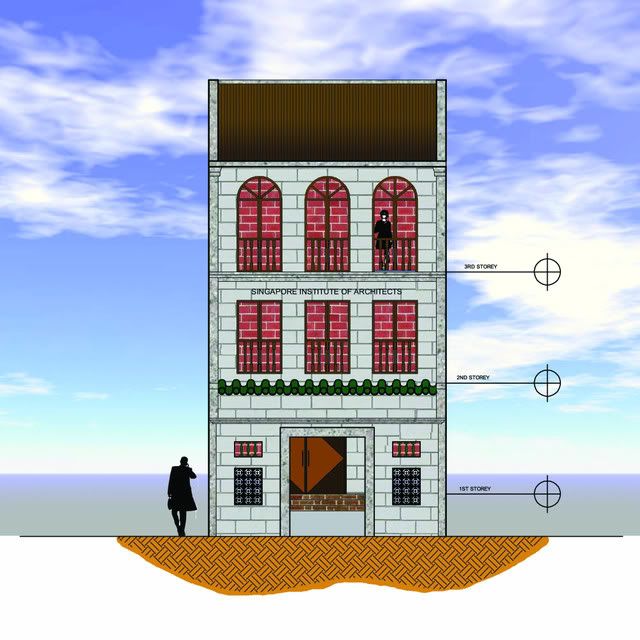
Front Elevation
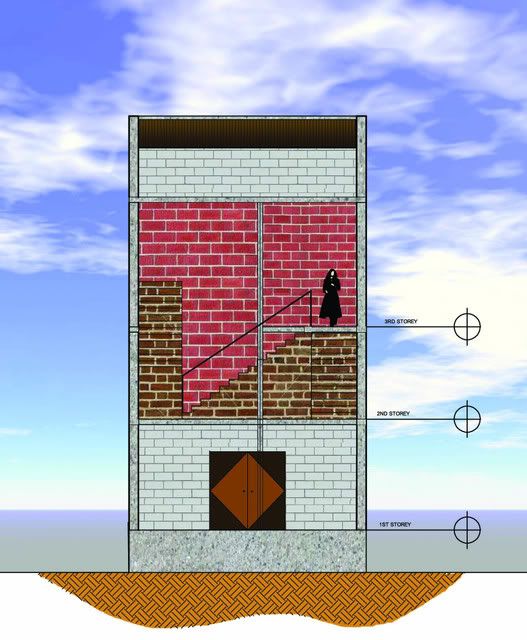
Section A-A
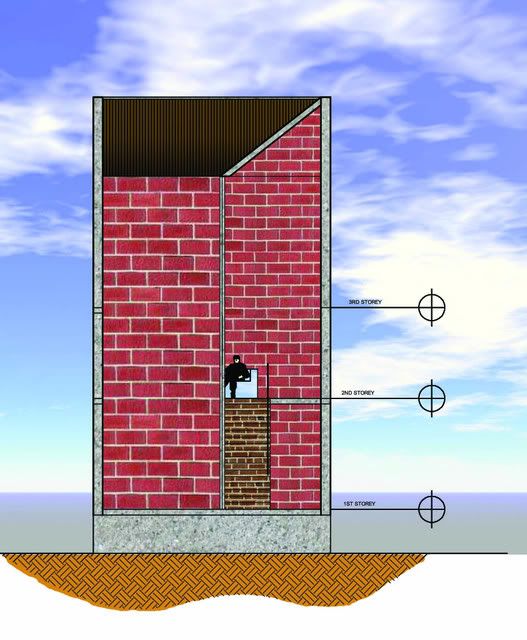
Section B-B
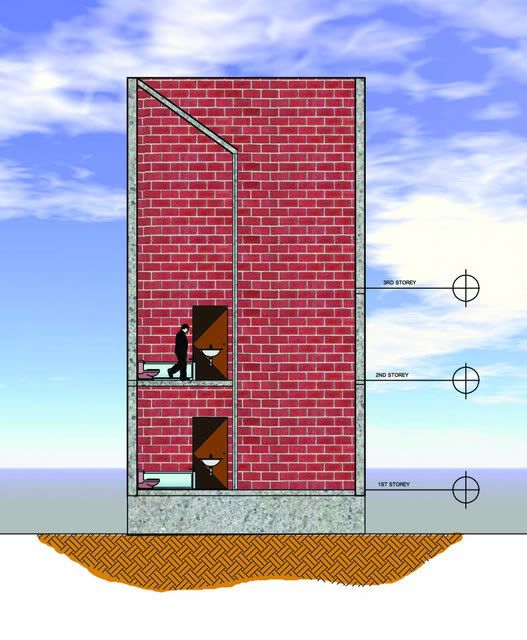
Section C-C
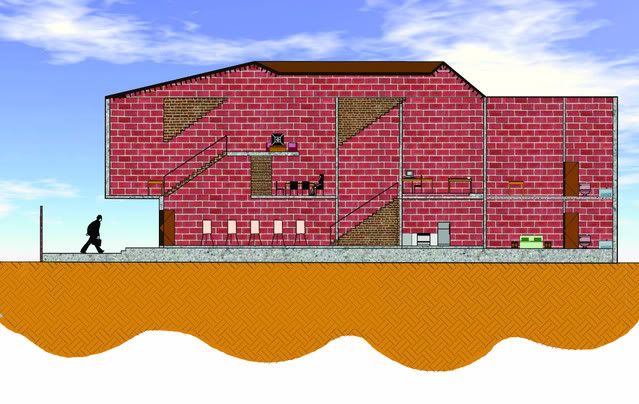
Section D-D
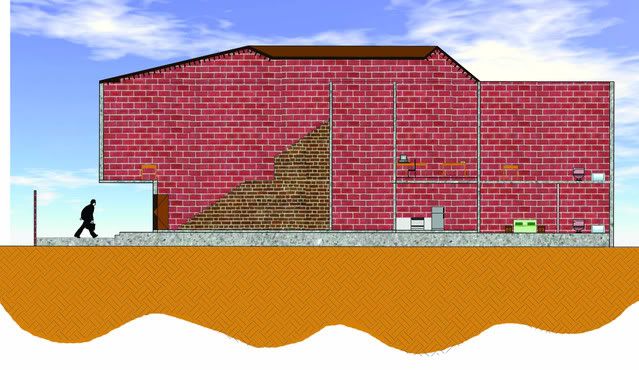
Section E-E
First Storyboard
Second Storyboard
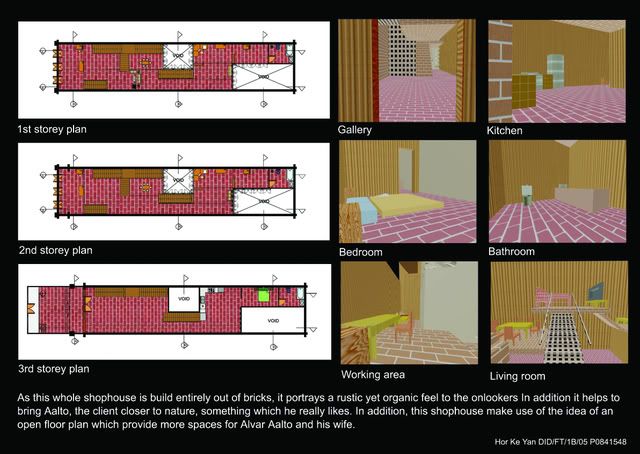
Overall I am happy with those rendering done through photoshop but I know that I need to work on my Viz rendering and the design of the storyboard!
It's time to break away from the simple, old and plain black background that everyone use to be using!
I put quite a lot of efforts in rendering the plans/elevations and sections through photoshop as I know that my rendering from VIZ isn't really great.

First storey plan

Second storey plan

Third storey plan

Front Elevation

Section A-A

Section B-B

Section C-C

Section D-D

Section E-E

First Storyboard

Second Storyboard

Overall I am happy with those rendering done through photoshop but I know that I need to work on my Viz rendering and the design of the storyboard!
It's time to break away from the simple, old and plain black background that everyone use to be using!
Tuesday, February 10, 2009
12/2
Basically during Semester 2, we had a series of assignments weekly that revolves around one topic which is none other than our 'Exhibition Pavilion Design'.
So I will leave the illustration of this topic to the picture as the saying goes: " Picture speaks a thousand word. "

This is how the pavilion looks like when I plot to pdf from Autocad.
This is how the pavilion looks like when I first imported it from Autocad to Autodesk Viz.
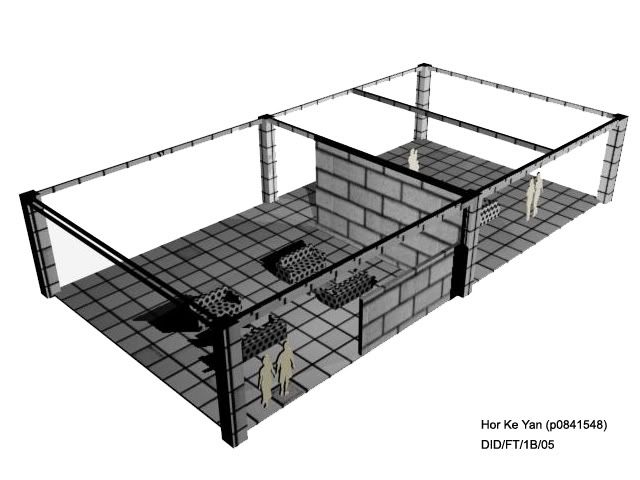
After which, I applied different materials to the pavilion. Basically I use grey and white tilings for the floor and white bricks for the rest of the structural elements.
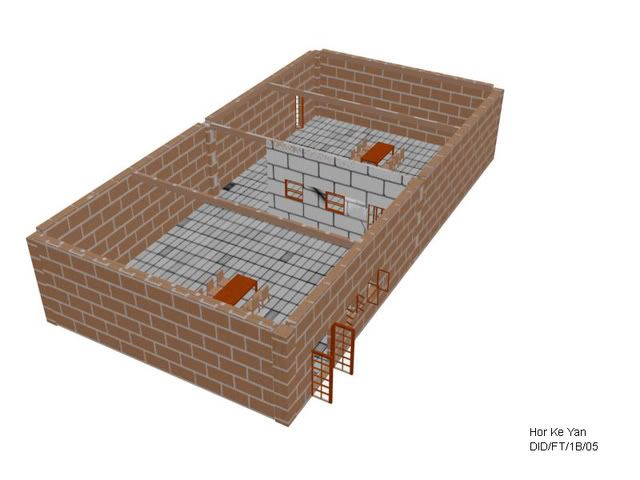
From this picture you can see a drastic change in the usage of materials as I decide that using red brick will be more suitable for my theme. Not only that walls are placed in along with the door and window.
The type of doors include pivot door, sliding door and folding door.
The type of window include awning window, projected window and sliding window.
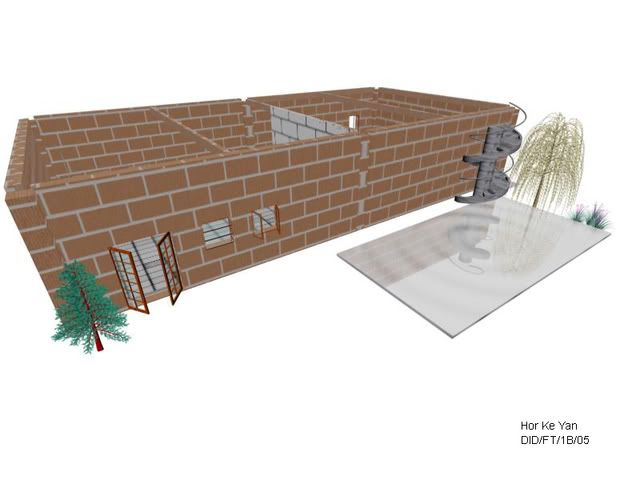
After that a 10000mm by 5000 mm by 100 mm reflection pool was place in along with trees and stairs.
Basically the types of stairs that I put in include spiral stair, L-shaped stair and straight stair.
After that we come to the final part of this whole string of assignments.
For this I created 2 storyboard as shown below.
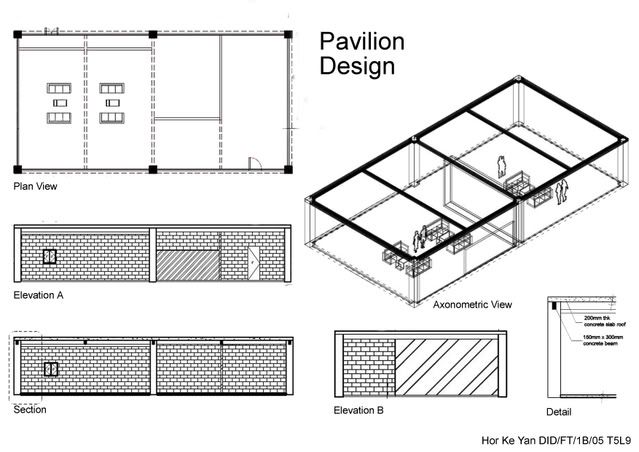
Storyboard 1 showing how the plan view, elevation and perspective of the pavilion before it was imported to Autodesk Viz.
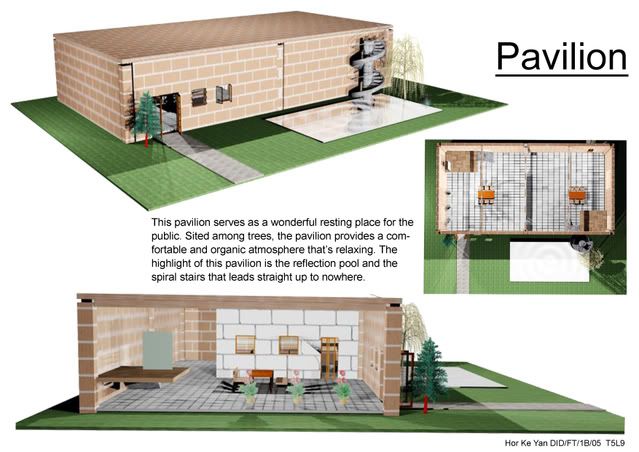
Storyboard 2 shows how the final pavilion design looks like along with a short description.
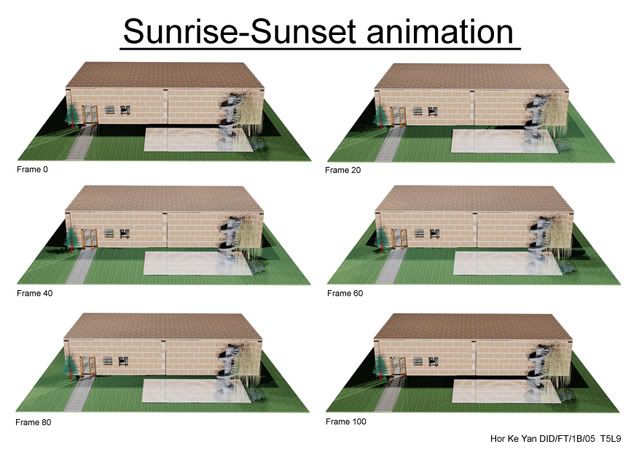
In addition, I had compiled 6 pictures taken at different frame count[animation] to show the effect of the sunrise and sunset.(take notice of the shadow)
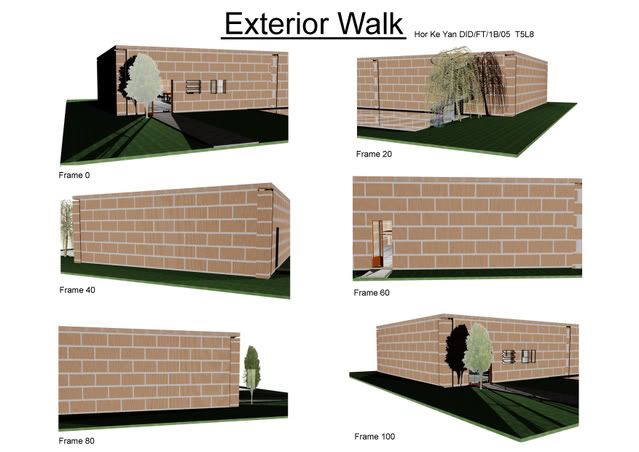
At the same time this is a compiled version of the exterior walk through of my pavilon from different views.
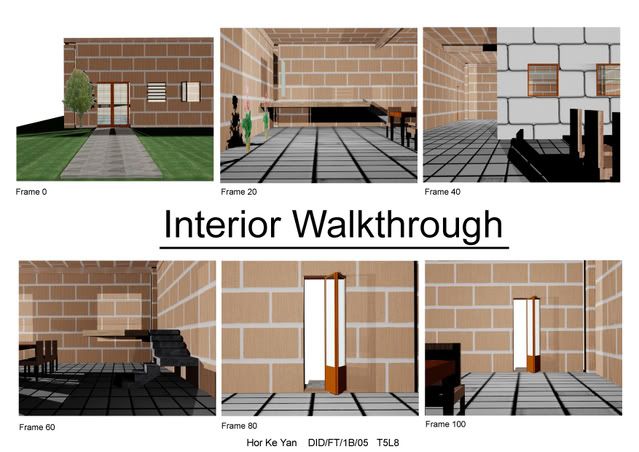
Lastly this is the interior walk through of my pavilion, showing the different places in it.
Basically what I feel about this project is that it's really fun to place the different materials and structural elements inside a building. However it can be quite frustrating especially when my rendering screwed up!!!
But overall, it's really great! (:
So I will leave the illustration of this topic to the picture as the saying goes: " Picture speaks a thousand word. "

This is how the pavilion looks like when I plot to pdf from Autocad.

This is how the pavilion looks like when I first imported it from Autocad to Autodesk Viz.

After which, I applied different materials to the pavilion. Basically I use grey and white tilings for the floor and white bricks for the rest of the structural elements.

From this picture you can see a drastic change in the usage of materials as I decide that using red brick will be more suitable for my theme. Not only that walls are placed in along with the door and window.
The type of doors include pivot door, sliding door and folding door.
The type of window include awning window, projected window and sliding window.

After that a 10000mm by 5000 mm by 100 mm reflection pool was place in along with trees and stairs.
Basically the types of stairs that I put in include spiral stair, L-shaped stair and straight stair.
After that we come to the final part of this whole string of assignments.
For this I created 2 storyboard as shown below.

Storyboard 1 showing how the plan view, elevation and perspective of the pavilion before it was imported to Autodesk Viz.

Storyboard 2 shows how the final pavilion design looks like along with a short description.

In addition, I had compiled 6 pictures taken at different frame count[animation] to show the effect of the sunrise and sunset.(take notice of the shadow)

At the same time this is a compiled version of the exterior walk through of my pavilon from different views.

Lastly this is the interior walk through of my pavilion, showing the different places in it.
Basically what I feel about this project is that it's really fun to place the different materials and structural elements inside a building. However it can be quite frustrating especially when my rendering screwed up!!!
But overall, it's really great! (:
Sunday, February 8, 2009
8;/2
At the beginning of this term, we had a lecture by Kelly on Design Principles. So basically, we are to take photos of architect/interior design that showcase the 16 design principles give n to us.
Guess what, I took a total of 313 photos and out of these I had to chose only 16 out of it!!! Imagine the frustrations I went through while picking through the photos.
Let me now present to you my final product.
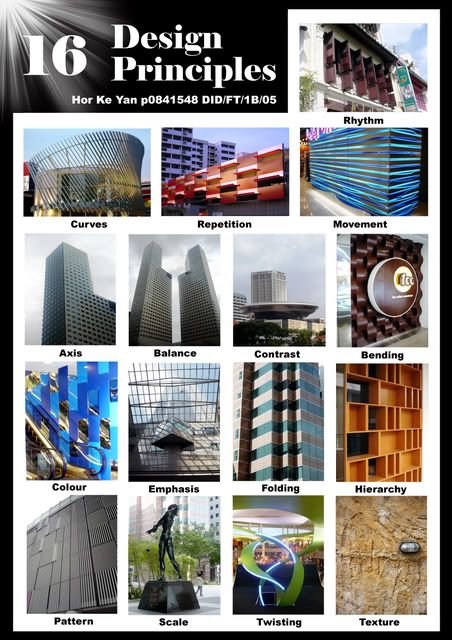
Out of this 16, my favorite is this : -->
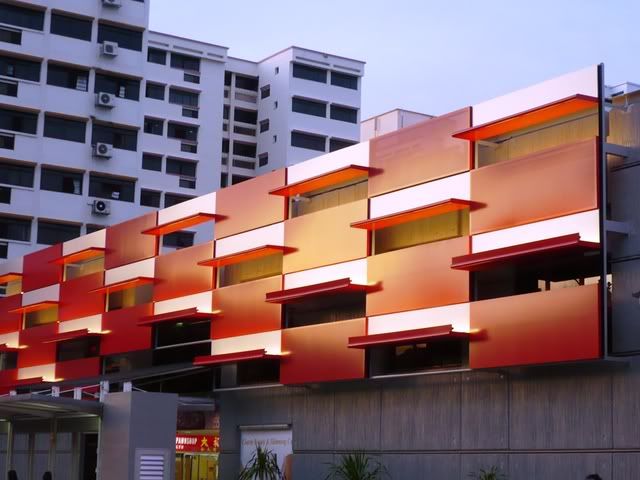
This is a new facade given to Yew Tee Shopping Center (:
I really love it, especially at night when the lighting are on.
Saturday, February 7, 2009
7/2
The other day Kelly gave an interesting lecture/assignment on Form, Function, Space and Order.
Some of the really interesting things to point out:
Interior Design starts with a point; extends into a line; stretches into a plane and evolves into a volume.
However as simple as it may seems, it is always difficult to put down the 1st pint, draw the 1st line, make the 1st plane and mould the 1st volume.
I think it's really true, along the way I kept having trouble starting, I think about this and that and I never really get about to doing it until someone came along and give me a push.
Therefore I think I'm in love with Nike ... for their famous slogan.

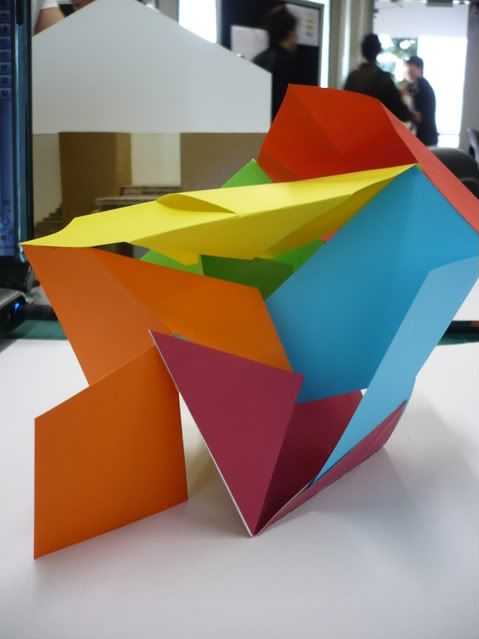
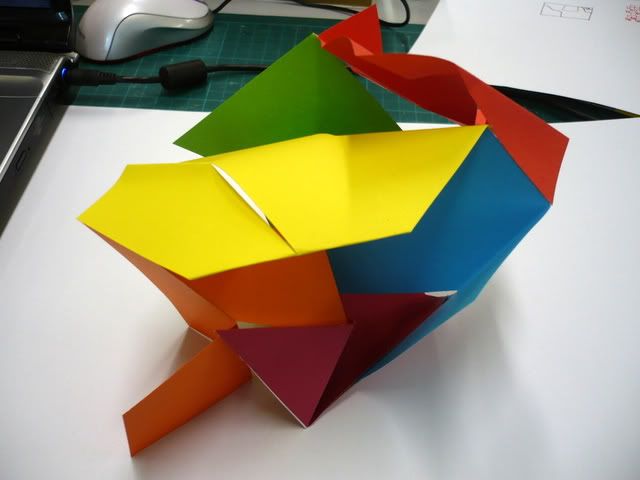
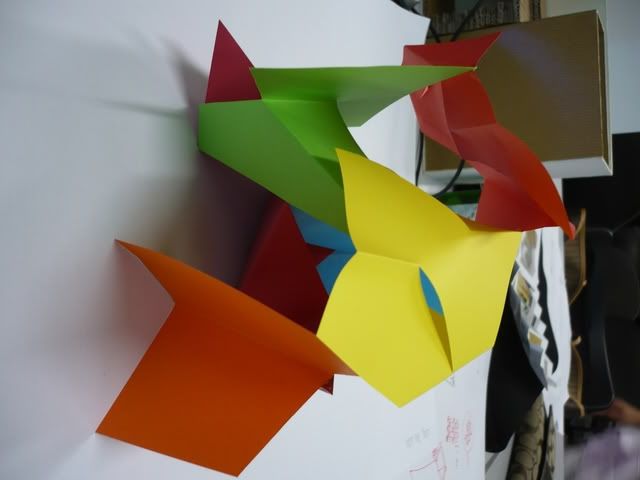
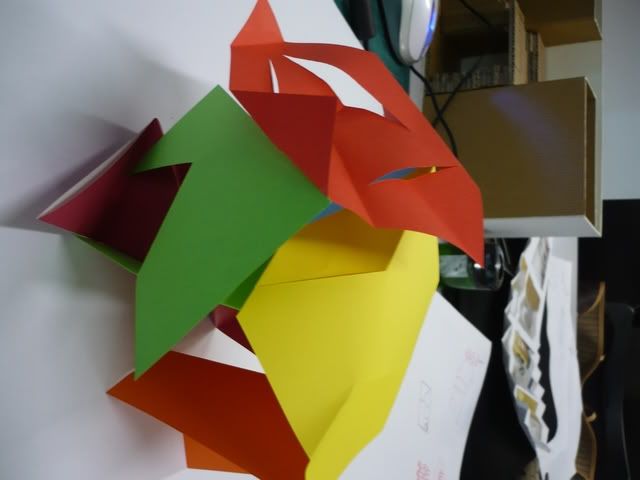
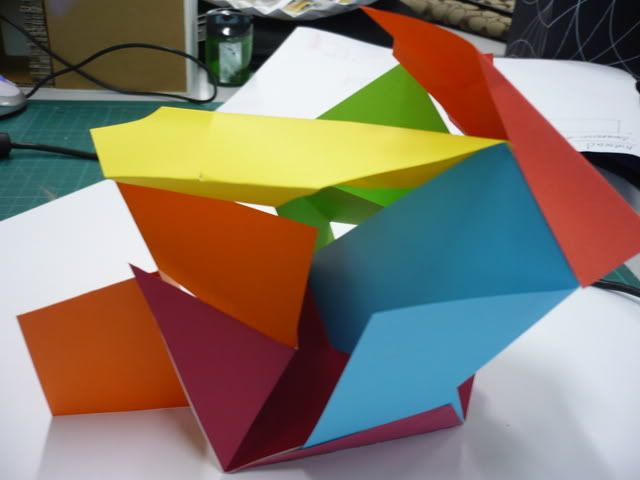
Therefore going into the assignment, Form A Form that is done only using folding to create a form.
Using a total of 5 pieces of paper, we are to:
 Photobucket" border="0">
 Photobucket" border="0">
 Photobucket" border="0">
 Photobucket" border="0">
 Photobucket" border="0">
And the space for this can be a museum or a playground.
Lastly, I want to share with you another thing that really gave me the strength when I was through the final lap for year 1.


IMPOSSIBLE IS NOTHING!
IMPOSSIBLE IS TEMPORARY!
So always think on the positive side and we can all do it!
Some of the really interesting things to point out:
Interior Design starts with a point; extends into a line; stretches into a plane and evolves into a volume.
However as simple as it may seems, it is always difficult to put down the 1st pint, draw the 1st line, make the 1st plane and mould the 1st volume.
I think it's really true, along the way I kept having trouble starting, I think about this and that and I never really get about to doing it until someone came along and give me a push.
Therefore I think I'm in love with Nike ... for their famous slogan.
Therefore going into the assignment, Form A Form that is done only using folding to create a form.
Using a total of 5 pieces of paper, we are to:
- 1 CUT 1 FOLD
- 1 CUTS 2 FOLDS
- 2 CUTS 2 FOLDS
- 2 CUTS 4 FOLDS
- X CUTS X FOLDS
 Photobucket" border="0">
 Photobucket" border="0">
 Photobucket" border="0">
 Photobucket" border="0">
 Photobucket" border="0">
And the space for this can be a museum or a playground.
Lastly, I want to share with you another thing that really gave me the strength when I was through the final lap for year 1.
IMPOSSIBLE IS NOTHING!
IMPOSSIBLE IS TEMPORARY!
So always think on the positive side and we can all do it!
Friday, December 12, 2008
12/12

I have such a scary dream a few nights ago which I guess only design students will dream of.
I dream that somehow I didn't manage to finish my work on time and I'm desperately rushing for time. The laptop cork up, the printer cork up, the time is ticking, the shop is closing and the assignment is due tomorrow!!!I'm rushing like mad, the musty smell in the printer shop is suffocating and the old bald man is staring at me impatiently.
I really don't know how to describe it but it's definitely scary enough for me to remember it till now.
I'm starting on my year one final project. I don't want to go through the scary experience!
Thanks Kelly for the quick reply!
Friday, December 5, 2008
7/12

I am so happy for Elaine !!!
She's indeed the prettiest bride I have seen so far.
Congratulations.
>.<
I'm not good with words so I shall keep this short.
All in All
ELAINE, WE ARE SO HAPPY FOR YOU
p/s: pai seh for the earring thingy
She's indeed the prettiest bride I have seen so far.
Congratulations.
>.<
I'm not good with words so I shall keep this short.
All in All
ELAINE, WE ARE SO HAPPY FOR YOU
p/s: pai seh for the earring thingy
Wednesday, December 3, 2008
3/12
Today I had my critique.
I guess this time round I am more composed and not as nervous as the previous critique. For this critique, we just need to present on our designers and the 3 things we are going to include in out shop house. However after presenting my 3 things to the lecturers, I realized that I got all my concepts wrong!
Oh No !!!
Anyway I will reflect on it and I intend to look for the lectures next week.
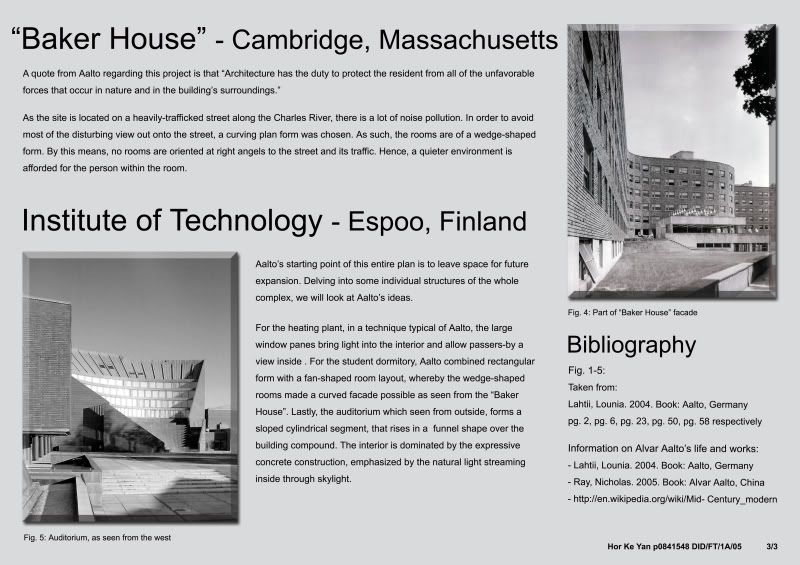
For now, let me present to you my TOD boards and INTECH boards.
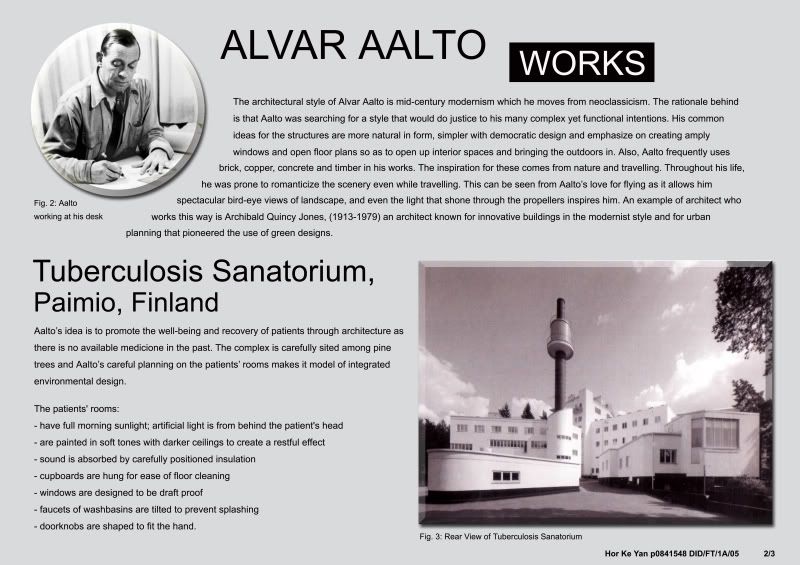
Oh one more thing to note, Kelly doesn't want to see the title arrange vertically. In another word, always place it diagonally.
I guess this time round I am more composed and not as nervous as the previous critique. For this critique, we just need to present on our designers and the 3 things we are going to include in out shop house. However after presenting my 3 things to the lecturers, I realized that I got all my concepts wrong!
Oh No !!!
Anyway I will reflect on it and I intend to look for the lectures next week.
For now, let me present to you my TOD boards and INTECH boards.


Oh one more thing to note, Kelly doesn't want to see the title arrange vertically. In another word, always place it diagonally.
Subscribe to:
Comments (Atom)